


I met Julie about five years on my first day of work at an IT recruiting firm and from the instant I saw her, I wanted to be friends with her. She radiated warmth, kindness, and humor, plus she was REALLY pretty, so I crossed my fingers and hoped she would want to be friends back. I ended up getting insanely lucky and Julie’s become one of my closest friends since then. She was the first person I got to talk to about my first date with Gerald (I ran to her office cube the morning after and actually sprawled on her desk with excitement), is the one I call when I need some honest life advice, and has ultimately become the big sister I never knew I needed. (We literally convince people we’re sisters when we’re out and they believe us.)
When Julie and her equally amazing husband Drew shared the news that they were pregnant, I was over the moon and basically scream/cried — I was literally laughing and sobbing at the same time walking down the sidewalk like a hyena. The Kings are one of our favorite couples and both they and Baby King deserve the absolute world, so I was honored to help decorate their baby shower.
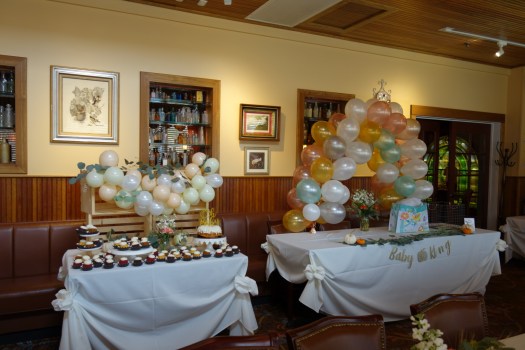
Julie and Drew have decided to not find out the baby’s gender, which I absolutely love. You only get so many true surprises in your life so I think it’s amazing that they are waiting until the delivery to find out! As a result, Jules and I landed on a general, neutral theme of “our little pumpkin” for the shower and I set to pinning away for inspiration. I have to admit, the decorations skewed a little bit more towards a girl, (spoiler, I do think it is a girl), but my goal was to embrace the fall season and to make the event as Instagrammable as possible.
Julie and Drew picked a really fun venue, The Bungalow Lakehouse in Sterling, VA, and my vision was to make it feel like you were in a fantasy pumpkin patch. The major challenges about the space were
1) you were not allowed to tape anything to the walls
2) I had never seen the space before
Luckily, the events coordinator was fabulous and sent me all of the table measurements and a mock up of the room — highly recommend asking for this if you’re helping plan an event! Other key questions include how many tables will be in the room so you can make the right number of centerpieces and how early you are allowed in the space to set up. We were only allowed one hour of set up time, so I did a TON of prep the night and morning before and we knocked out the decorations in basically 20 minutes. (Shout out to Mama Crane and Collie for help setting up!)
I got lucky and was able to get a lot of the shower supplies from local stores, but for the rest I turned to Etsy and Zazzle. Below is a breakdown of where I got each item and my advice for future baby shower decorators!


BALLOONS
- Cake Table Balloon Garland – Etsy | I saw this balloon garland on Pinterest and was determined to have it at the shower. The exact garland kit was linked on the pin and it included all of the balloons, a plastic strip to assemble the garland, and ribbon to attach it to whatever you would like. The Etsy shop also recommended purchasing a hand pump to blow up the balloons (the garland doesn’t require helium) so I got that in my kit as an add-on. The whole thing took about 35 minutes to blow up, tie, and arrange the balloons. I would highly recommend a garland kit from this Etsy shop!
- Wood Crates – A.C. Moore | I originally wanted a wood pallet to hang the balloon garland on, just like the Pinterest picture, but after talking a team member at Home Depot into giving me one for free, realized I couldn’t fit it in Gerald’s car. *face palm* My mom had the idea to use wooden crates instead, and it was perfect because we stacked all of the florals and pumpkins in the crates to transport them to the venue.
- Baby Script Balloon – Etsy | I got this balloon from the same shop as the garland and originally wanted to hang it from the bottom of the larger balloon arch, but it turned out to be massive in real life! The balloon comes with a straw to poke a hole in it to blow it up (not going to lie, I had to Google how to do it), but it only took about 45 seconds to inflate the balloon with the hand pump once I figured out how to insert it in the balloon opening. Instead of hanging it on a wall or arch, we used the balloon as a sort of photo prop and I think it turned out cute!
- Balloon Arch – Party City | The night before the shower, I headed to the burbs and loaded up on helium balloons — you should have seen the looks I got when I rolled up 45 minutes to closing and put 50 balloons on the balloon center counter, do not recommend doing this. Warning, it takes a long time to blow up helium balloons in bulk, so be prepared to wander aimlessly around the party store for a minimum of 20 minutes. Helium balloons are not guaranteed to last to the next day, so I asked for a special glue to be put in the balloons that makes them last about five days. It is an extra cost, but so worth it! To assemble the arch, all you need to do is get two weights (you can purchase them at the party store), measure a piece of curling ribbon to the length of the base of the arch (i.e. if you know the table is 5′ long, measure out five feet) then pull the ribbon up into an arch, estimating how high you want the actual arch to go. For a 5′ table, I used about 11′ of ribbon. To make it easier, I suggest tying the ribbon on the backs of two chairs and stretching them out across the room so you have a taut base to work with. From there, just cut the ribbons on the balloons to about 1.5″ and tie a basic knot onto the base ribbon, keeping the balloons close enough to form a ring of about four balloons around the ribbon. Keep tying all of the balloons around the base ribbon (the closer the better) until you’re out and then attach the base ribbon to the weights. Once you have the base ribbon weighted down, it will naturally form an arch! It’s time consuming, but actually so easy to create.


PAPER PRODUCTS
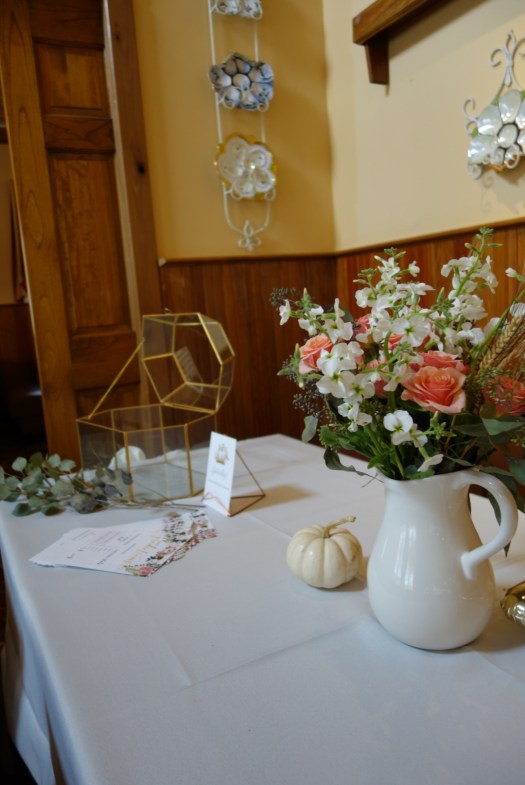
- Welcome Sign + Table Cards – Zazzle | It is extremely easy to create custom designs on Zazzle — there are tons of templates to choose from and you can edit nearly all parts of the text in the template. The designs I chose were actually wedding save the dates and a wedding welcome sign, but within a few minutes they easily became baby shower signage! I accidentally ordered just a print of the sign, not an actual card stock sign, but picked up a poster board when I got the crates and attached eucalyptus with floral wiring to cover up the extra portion on top.
- Easel – Amazon | Whatever you do, do not buy this easel off of Amazon. It sucks and is impossible to put together. That is all.
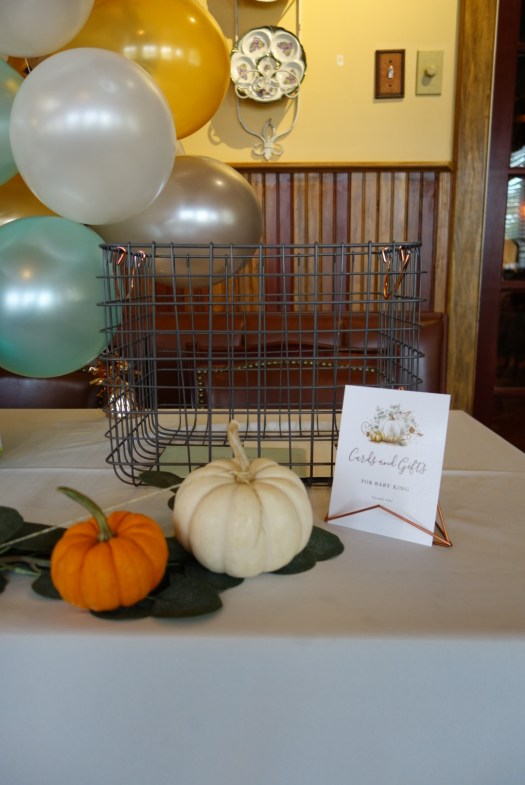
- Prediction Cards – Zazzle | Julie didn’t want to play any games at the shower, but we both thought it would be a cute idea for guests to guess the gender! I liked these prediction cards because they had room to guess the time the baby would be born, who they would resemble, and a little spot to leave a personalized note for the parents-to-be. I used the card drop box from our wedding as a place for people to leave their predictions. Don’t forget to bring a bunch of pens as well!
- Table Card Holders – Etsy | I totally forgot that I had a ton of table card holders from our wedding (see note below about taking inventory of your place before buying things), but these little mod triangle holders were super cute and very affordable.
- Baby King Sign – Etsy | Another easy customizable paper product! This was too cute to pass up. Instead of taping it to the gift table, I tied the strings around the stems of two pumpkins and that way we could easily adjust the placement and make sure it was centered— plus it looked better than tape on a tablecloth!


FLORALS
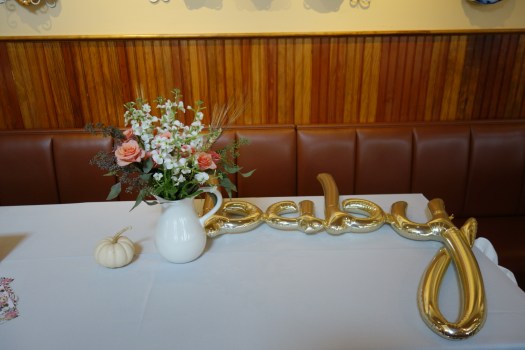
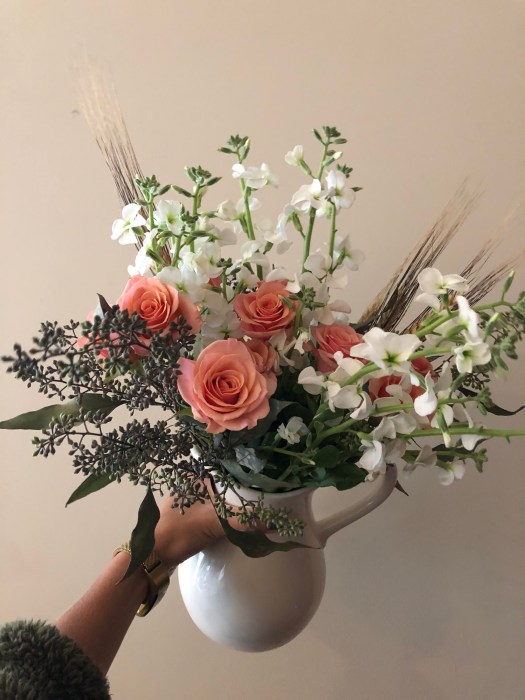
- Flower Arrangements – Trader Joe’s | I got all of the supplies for the floral arrangements from my local Trader Joe’s — their flower department is actually very robust and affordable. The weekend before the shower, I got all of the eucalyptus they had in stock because I was afraid that they would be out the weekend of the shower. (Yes, I looked like a psycho carrying it all down 14th St.) Eucalyptus lasts forever and it doesn’t dry up immediately when it doesn’t have water, so it’s ideal for table scapes or draping around the room. I got the actual flowers the day before the shower and just winged it, hoping they would look good together. The hay-like fillers were also from TJs and make a massive mess, but I think they helped pull the arrangements together! Before you run out and buy a ton of vases, raid your kitchen cabinets — I had all of these mason jars on hand already and just pulled from my personal vase stash and had more than enough vessels for the whole room.
- Pumpkins – Trader Joe’s, Home Depot, and Giant | This time of year, you can get pumpkins ANYWHERE, but Trader Joe’s had the cheapest at $0.69 a mini pumpkin. Giant had them as 10 for $10, and Home Depot was a total rip off so don’t even bother going there. If there are kids at the shower, let them take home a pumpkin as a treat so you don’t have 50 pumpkins filling your apartment!
Thank you to Julie and Drew for letting me be part of your special shower — Baby King is so loved already and I can’t wait to meet them in just a few months!
The dress I wore is Rebecca Minkoff from Rent The Runway. You can use my code SCOLLIE50 for 50% off your first month of Unlimited!


